 Learn Arabic
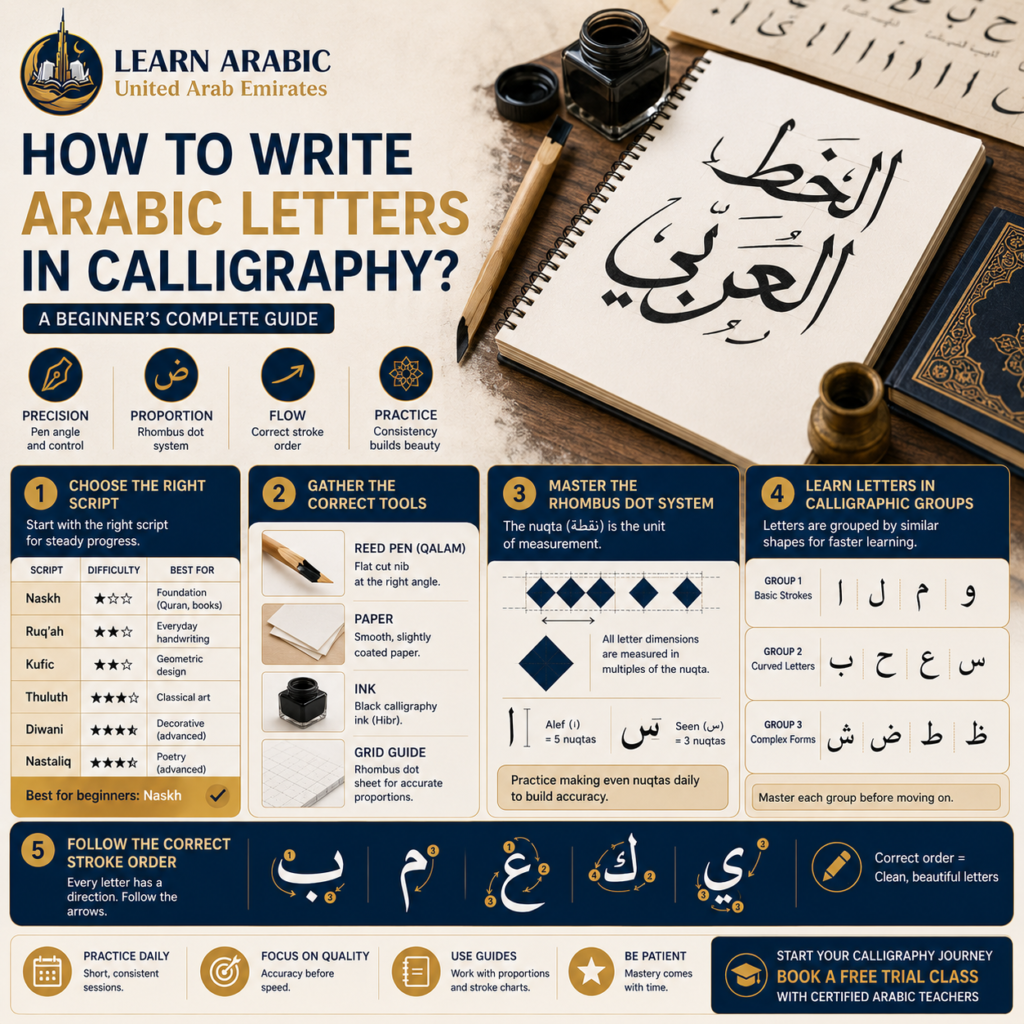
Arabic calligraphy is one of the world’s most celebrated art forms, but it’s often mistaken for decorative handwriting. In reality, it is a disciplined practice built on precise rules that govern pen angle, letter proportions, and stroke order. Understanding these fundamentals is what allows beginners to develop consistent, well-balanced letterforms.
Every calligraphy script follows its own structured system, making technique more important than artistic talent. Before learning any specific style, it’s essential to understand the three core principles that form the foundation of Arabic calligraphy: pen angle, letter proportions, and stroke direction.
One of the biggest mistakes beginners make is starting with a script that’s too advanced. Each Arabic calligraphy style has its own rules, proportions, and level of difficulty, so choosing the right script is essential for steady progress.
1. Choose the Right Arabic Calligraphy Script for Your Level
There are six major Arabic calligraphy scripts, each with distinct visual character, proportional rules, and difficulty level. Choosing the wrong starting script is the most common reason beginners plateau within the first month.
What are the main Arabic calligraphy styles?
The six classical Arabic calligraphy scripts are Naskh, Thuluth, Ruq’ah, Kufic, Diwani, and Nastaliq. While each has a unique visual style and purpose, they are not equally suitable for beginners.
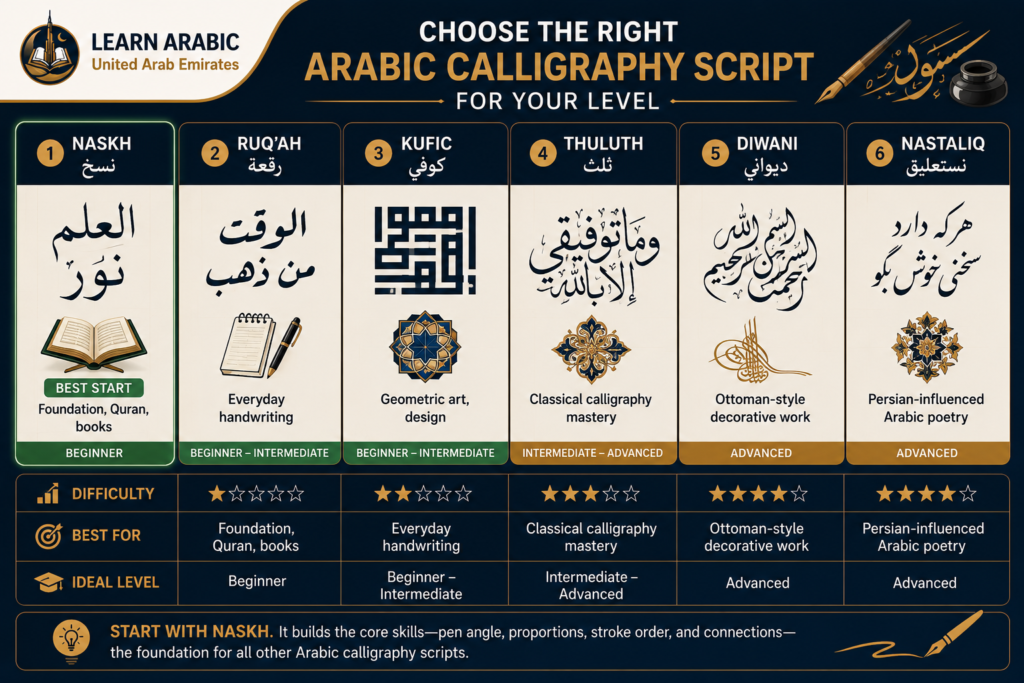
- Naskh (نسخ) is the best script for beginners. It forms the basis of modern printed Arabic, including the Quran, books, and official publications. Its clear proportions and consistent letterforms make it the ideal script for learning fundamental calligraphy techniques.
- Ruq’ah (رقعة) is the script used for everyday handwriting. Although simpler and faster to write, it is designed for practicality rather than teaching calligraphic principles.
- Thuluth (ثلث) is an advanced script known for its elegant, elongated letters and complex proportions. It requires excellent pen control and is best suited to experienced calligraphers.
- Kufic (كوفي) features bold, geometric letterforms and is commonly used in architecture, logos, and decorative artwork. It’s a good choice for learners interested in geometric Arabic design.
- Diwani (ديواني) and Nastaliq (نستعليق) are highly decorative scripts with intricate structures, making them more appropriate for advanced learners.
Start with Naskh. It teaches the core skills—pen angle, letter proportions, stroke order, and letter connections—that provide the foundation for learning every other Arabic calligraphy style.
| Script | Difficulty | Best For |
| Naskh | Beginner | Foundation, Quran, books |
| Ruq’ah | Beginner–Intermediate | Everyday handwriting |
| Kufic | Beginner–Intermediate | Geometric art, design |
| Thuluth | Intermediate–Advanced | Classical calligraphy mastery |
| Diwani | Advanced | Ottoman-style decorative work |
| Nastaliq | Advanced | Persian-influenced Arabic poetry |
2. Gather the Correct Tools Before You Begin
Tool choice in Arabic calligraphy is not a secondary concern — it directly determines output quality from the first session. Beginners who use the wrong pen produce letterforms they blame on skill, when the real cause is equipment.
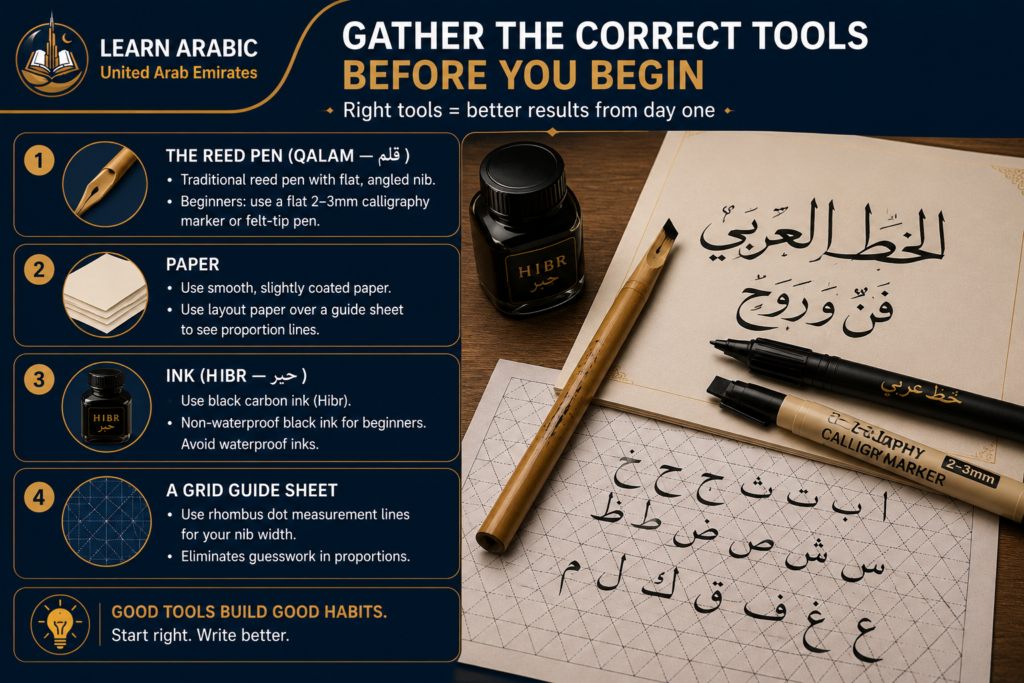
A. The reed pen (Qalam — قلم)
The traditional instrument of Arabic calligraphy is the reed pen, cut from dried bamboo or reed grass to produce a flat, angled nib. Reed pens are still used by serious calligraphers and are available from specialized suppliers. For beginners, a high-quality calligraphy marker or felt-tip pen with a flat 2–3mm nib is an acceptable starting tool — it holds a consistent angle and requires no cutting or preparation.
B. Paper
Arabic calligraphy ink bleeds on standard printer paper, producing fuzzy edges instead of clean strokes. Use smooth, slightly coated paper — layout paper or calligraphy practice paper — that allows the pen to glide without catching. In early practice, translucent layout paper placed over a guide sheet lets you see proportion lines through the paper.
C. Ink
Traditional Arabic calligraphy uses black carbon ink (Hibr — حبر), which dries to a matte finish and produces clean, consistent lines. For beginners, a non-waterproof black ink in a small bottle, used with a dip pen or loaded reed, is correct. Waterproof inks clog reeds quickly.
D. A grid guide sheet
Print or draw a sheet with rhombus dot measurement lines for your chosen nib width. This guide sheet sits under your practice paper and eliminates the need to measure proportions by eye until your visual sense of correct proportion is established.
Read More: How to Write Arabic in Keyboard English?
3. Master the Rhombus Dot Proportional System
The rhombus dot system, known as the nuqta (نقطة), is the foundation of proportion in Arabic calligraphy. Rather than estimating letter sizes by eye, calligraphers use the nuqta as a fixed unit of measurement to ensure every letter follows consistent proportions. This system is what gives Arabic calligraphy its balance, harmony, and visual precision.
To create a nuqta, press the flat edge of your pen onto the paper at the correct angle, producing a diamond-shaped mark. The dimensions of every letter are then measured as multiples of this mark. For example, in Naskh script, the Alef (ا) is five nuqtas tall, while other letters have their own standardized heights, widths, and curves based on the same measurement unit.
Before practicing complete letters, spend time making rows of evenly sized and evenly spaced nuqtas. This simple exercise trains you to maintain a consistent pen angle and pressure—two skills that directly affect every letter you write. Mastering the nuqta first creates the foundation for accurate, well-proportioned Arabic calligraphy.
Learn Arabic Letters in the UAE with a FREE Trial Class

Step Inside Our Classrooms
Don’t just take our word for it—see our community in action. Click below to watch real, live snippets from our recent classes and experience our engaging teaching style firsthand!
Master Arabic in the UAE
Experience world-class Arabic language training designed for students and professionals in the Emirates.
Book Your Free Trial4. Learn the Arabic Letters in Calligraphic Groups
Arabic calligraphy instruction groups letters by shared structural forms, not alphabetical order. Letters that share a base shape are learned together, because the pen movement for the base form transfers directly between them.
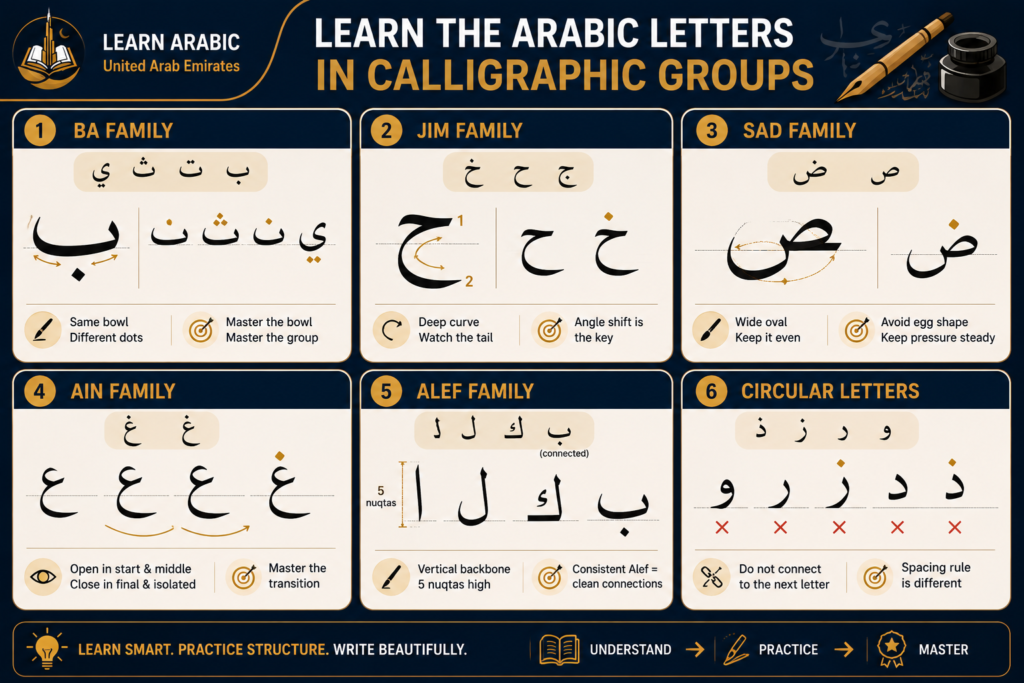
Group 1 — The Ba family: ب، ت، ث، ن، ي
These letters share a shallow horizontal bowl with a connecting baseline. The bowl depth, the connecting exit stroke, and the dot placement differ, but the pen movement for the bowl itself is identical across all five. Mastering the Ba bowl gives you the structural foundation for the entire group.
Group 2 — The Jim family: ج، ح، خ
A deep curved form with a pronounced descending tail. The tail of Jim descends below the baseline in Naskh; the tail of Ha does not. The pen angle shift at the curve’s lowest point is the critical skill in this group.
Group 3 — The Sad family: ص، ض
A wide, open oval body with a connecting exit. The oval must be geometrically consistent — the most common error here is producing an egg-shape rather than a true rounded oval, caused by inconsistent pen pressure through the curve.
Group 4 — The Ain family: ع، غ
An eye-shaped open form in initial and medial position, closing into a reverse curve at the final and isolated positions. The transition between open and closed forms within the same letter group is one of the more technically demanding elements of Naskh.
Group 5 — The Alef family: ا، ل، ك، ب (in connected form)
Vertical strokes form the structural backbone of Arabic script. The Alef in Naskh is a clean vertical stroke — five nuqtas tall, hairline-thin at the top, slightly weighted at the base. Inconsistent Alef verticals are immediately visible in connected words and are the most reliable indicator of beginner-level calligraphy.
Group 6 — The circular letters: و، ر، ز، د، ذ
These letters share rounded or semi-circular forms and — critically — do not connect to the following letter. The non-connecting rule affects spacing: the gap after a non-connecting letter follows different proportional rules than the gap between two connecting letters.
Read More: Arabic Writing Practice In The UAE
5. Practice Individual Letters Before Connecting Them
The most consistent mistake in beginner Arabic calligraphy is moving to connected words before individual letterforms are stable. A word is only as consistent as its weakest letter. One irregular Ba bowl in the middle of a word pulls the entire composition toward uneven.
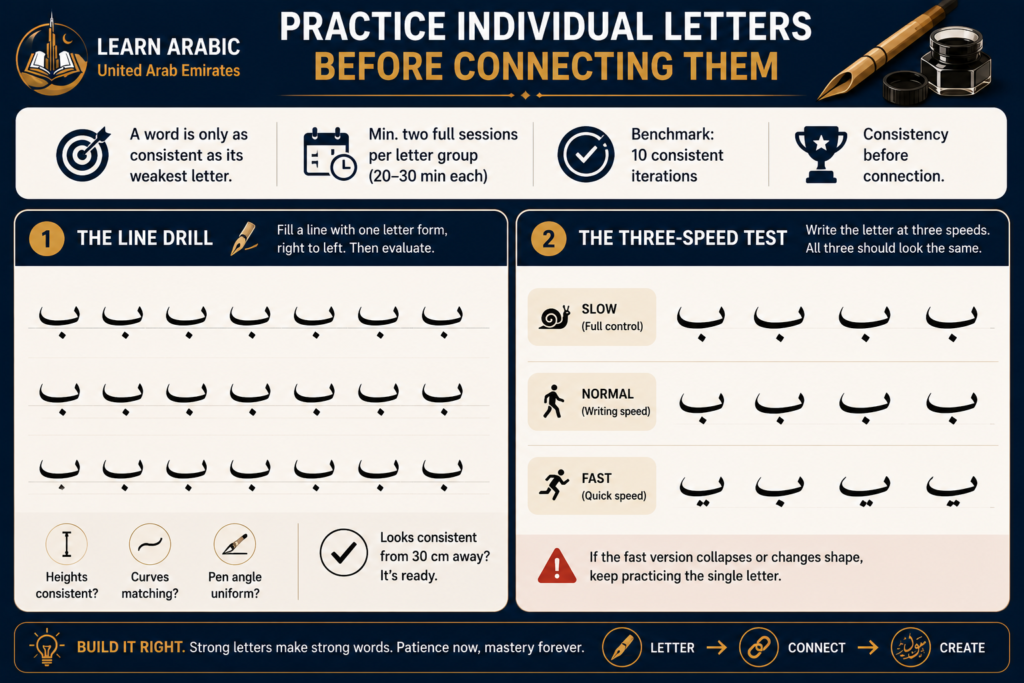
Dedicate a minimum of two full sessions per letter group — approximately 20–30 minutes per session — before writing any connected combinations. The benchmark is not time; it is consistency. When ten consecutive iterations of a letter look identical to each other, the letterform is ready to connect.
A. The line drill
Fill a full line of practice paper with one letter form, working across the page from right to left. Then evaluate the entire line as a composition: are the heights consistent? Are the curves matching? Is the pen angle uniform? A line that looks consistent from 30 centimeters away is ready; one that shows visible variation needs more single-letter work.
B. The three-speed test
Write the letter slowly (full attention to form), at normal writing speed, and quickly. All three versions should be recognizable as the same letter with the same proportions. If the fast version collapses — losing the bowl depth or the curve — the motor memory is not yet established.
Read also: Arabic Worksheets for Kids – A Complete Guide
6. Connect Letters Into Words Using Root-Based Practice
Once individual letterforms are stable, connecting them follows a specific method that uses Arabic’s root-based vocabulary structure to your advantage.
Arabic words derive from three-letter roots, and the connecting strokes between letters follow the same proportional rules as the individual letter exits. Practicing root families — groups of related words that share letter combinations — builds connection fluency faster than random word practice.
Start with the root ك-ت-ب (writing):
- كَتَبَ — Kataba — He wrote
- كِتَاب — Kitab — Book
- كَاتِب — Katib — Writer
- مَكْتَب — Maktab — Desk
All four words use the same three letters in connected form. Practicing this root family trains the Ka–Ta–Ba connection sequence until it becomes automatic. The words are also immediately useful — they are among the most common Arabic words in any context.
The exit stroke of one letter must meet the entry point of the next at the baseline level, with consistent spacing determined by one nuqta between letters. Connections that dip below the baseline or rise above it produce script that looks broken rather than flowing.
Read more: How to Introduce Yourself in Arabic?
7. Build a Daily Practice Routine That Produces Results
Progress in Arabic calligraphy is determined almost entirely by session structure, not session length. Twenty focused minutes daily produces faster results than two unfocused hours on weekends.
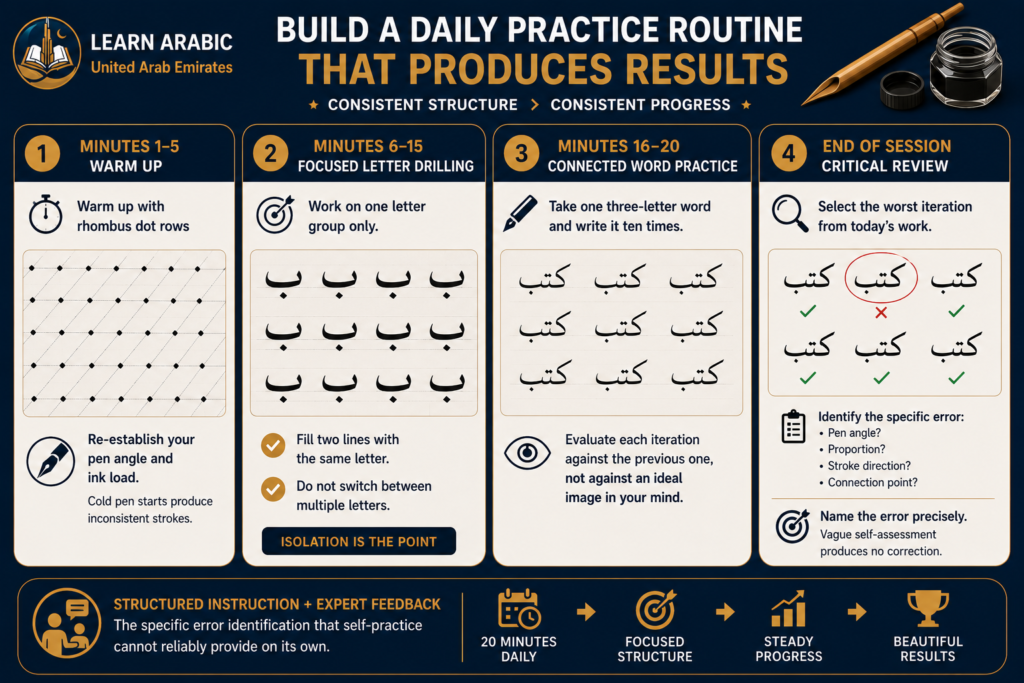
A. Minutes 1–5: Warm up with rhombus dot rows
Re-establish your pen angle and ink load before touching letterforms. Cold pen starts produce inconsistent first strokes.
B. Minutes 6–15: Focused letter drilling
Work on one letter group only. Fill two lines with the same letter before moving to a variation. Do not switch between multiple letters in the same session — isolation is the point.
C. Minutes 16–20: Connected word practice
Take one three-letter word and write it ten times. Evaluate each iteration against the previous one, not against an ideal image in your mind.
D. End of session: Critical review
Select the worst iteration from the day’s work and identify the specific error — was it pen angle, proportion, stroke direction, or connection point? Name the error precisely. Vague self-assessment (“it doesn’t look right”) produces no actionable correction.
The Learn Arabic UAE academy pairs structured Arabic writing instruction with direct instructor feedback — the kind of specific error identification that self-practice cannot reliably provide on its own.
See Our Classroom Environment in Action
Experience a sneak peek into our live sessions. Watch the video below to see our specialized instructors interacting with students, breakdown complex texts, and cultivate an engaging, respectful learning environment.
Master Arabic in the UAE
Experience world-class Arabic language training designed for students and professionals in the Emirates.
Book Your Free TrialMaster Arabic Calligraphy with Learn Arabic UAE
Learning Arabic calligraphy is about more than copying beautiful letterforms. Real progress comes from understanding proportions, pen control, and stroke order through consistent practice and expert guidance. With the right instruction, you can build strong fundamentals and develop a confident, disciplined calligraphy style from the very beginning.
At Learn Arabic UAE, our experienced native Arabic instructors provide structured lessons tailored to your skill level. Through personalized feedback, practical exercises, and flexible online classes, you’ll steadily improve your pen technique, letter formation, and overall calligraphy skills while learning at a pace that fits your schedule.
Book your free trial class today and begin your Arabic calligraphy journey with Learn Arabic UAE.

Our Arabic courses
- Arabic Course in the UAE
- Arabic Intensive Course
- Arabic Classes for Beginners (Learn Arabic from Scratch)
- Madinah Arabic Course
- Arabic Classes for Adults
- Self-Paced Arabic Course
- Arabic Speaking Classes
- Learn to Write Arabic Course
- Fusha Arabic Course
- Classical Arabic Course
- Emirati Arabic Course
- Business Arabic Course UAE
- Arabic Language Classes for Professionals in UAE
Master Arabic in the UAE
Experience world-class Arabic language training designed for students and professionals in the Emirates.
Book Your Free TrialConclusion
Arabic calligraphy is a rule-governed art form with a clear learning sequence. Start with Naskh. Use the correct tools from the first session. Master the rhombus dot proportional system before writing any letters. Practice letter groups in isolation until individual forms are stable, then connect them using root-based word families. Review errors specifically and correct them before the next session.
Progress is nonlinear — most beginners experience a visible improvement spike around weeks three to four, when the pen angle and stroke direction become automatic and attention shifts fully to proportion. That shift is when Arabic calligraphy starts to feel like art rather than exercise.
Frequently Asked Questions About How to Write Arabic Letters in Calligraphy
Before you begin practicing Arabic calligraphy, you may have questions about choosing the right script, selecting the proper tools, and building effective practice habits. The answers below address the most common questions beginners ask to help you start with confidence and avoid common mistakes.
Which Arabic calligraphy style should a complete beginner learn first?
Naskh is the correct starting point for beginners without exception. It has the most clearly documented proportional rules, the most consistent letterforms, and it is the foundation from which all other Arabic calligraphy styles are best approached. Learners who start with Thuluth or Diwani consistently develop foundational errors that take months to correct.
What pen should I use to start Arabic calligraphy?
A flat-nibbed calligraphy marker with a 2–3mm nib is the most practical starting tool. It holds a consistent angle, requires no ink preparation, and produces clean letterforms on smooth paper. Reed pens are the traditional instrument and worth learning once basic pen control is established — but they require additional skill to prepare and maintain correctly.
How long does it take to write Arabic calligraphy at a recognizable level?
Most beginners who practice for 20 minutes daily can produce clean, proportionally consistent individual letters in Naskh within four to six weeks. Connected word writing with consistent proportions typically takes eight to twelve weeks. The timeline depends almost entirely on session structure and whether errors are being identified and corrected — not on the total hours spent.
What is the rhombus dot system in Arabic calligraphy?
The rhombus dot (nuqta) is the basic unit of measurement in Arabic calligraphy. It is produced by pressing the pen nib flat onto the paper at the script’s correct angle, creating a diamond-shaped mark. Letter heights and widths are defined in multiples of this unit — an Alef in Naskh is five nuqtas tall, for example. This system gives each script its characteristic proportions and is what separates calligraphy from decorative handwriting.
Can I learn Arabic calligraphy without knowing how to read Arabic?
Yes — many calligraphy learners begin without reading knowledge. However, learners who understand Arabic letter structure and positional forms (initial, medial, final, isolated) progress significantly faster, because they understand why letters look different in different positions rather than treating each positional form as a separate shape to memorize. Learning basic Arabic letter recognition alongside calligraphy practice produces better combined results than pursuing either in complete isolation.
Is daily practice necessary, or can I practice a few times a week?
Daily practice of 15–20 minutes produces faster and more durable results than longer sessions two or three times per week. The reason is motor memory: the pen angle, stroke pressure, and proportion judgments involved in calligraphy are physical skills, and physical skills consolidate through frequent repetition rather than occasional extended practice. Even ten focused minutes daily outperforms a 90-minute weekly session for building consistent letterforms.


Leave a Reply